Surrealist Teacup
Title: Surrealist Teacup
Type of Project: Guided Exploration
Project Description: Students will develop an understanding of Surrealism and apply these ideas to a sculpture which marries the impossible with reality. Students will develop an understanding of working "in the round" and develop a meaningful theme to their piece.
Processes and Activities: After reviewing the chapter on sculpture in their text and reviewing a presentation that showcased what artists have done working in a surrealist sculpture method, students began developing their own ideas. Research online and working together to hone ideas were important first steps in this process. Students then had to begin to assemble their piece - the first challenge being getting the sculpture to have an even weight so that it could balance. Once that path was crossed, students got to begin to assemble their theme to the basework and watch their projects come to life.
Evaluation Criteria:
1. The piece reveals a believable tension between reality and the impossible. The piece can stand on its own and functions as a whole.
2. The sculpture is viewable in the round with multiple viewpoints considered. Details are added for all angles.
3. The pouring component relies on thickness and thinness of the material to create a believable pour.
4. Additional elements added complement the work and are carefully placed to create a balanced composition.
5. Creative solution to the assignment. You worked to create a unique artwork that has taken a life of it’s own! You took risks with this project and worked to make it one of a kind.
6. Artist Statement is thoughtfully written, with reflection on your process and explanation of the sculpture being a priority.
7. Evidence of research is apparent through the sketches done in your sketchbook. A process and risk taking was considered as you worked toward your final product.
8. Use of class time, care of materials, attitude and care toward assignment. Clean up is immaculate every day. You came prepared and worked hard toward making this assignment amazing! You were a dedicated artist and used the class time solely for the purpose of developing this project to greatness.
Nicole
When I first began my Surrealist Teacup project, I wanted a project that held a special meaning. At first I had the idea to have snow falling into a snow globe and later be used as a christmas decoration. This way the art has a purpose and adds something to someone's life. The idea did not work because of the difficulty of creating falling snow. I then decided on a music theme because music is a common mode of art. My inspiration for the project came from my Grandma; she loves music just as much as me. I wanted to give her my final project as a decoration for her piano, where she can daily see it rest. I first began with the music idea of having a clarinet bell pour out music into an ear. Again, the idea did not work out. I then went with the idea I have now, music flowing onto a regular saucer. The music rushing out of the bell comes in thin paper strips of sheet music. As it reaches the plate it floods outward, cascading the plate with waves of music. Large 3D music notes, a heart, and a treble clef all add a new dimension and detail to the saucer. The project also includes small shining, silver beads throughout the plate; bringing out the shine in the clarinet bell. The entire music themed project gives the viewer a sense of calm, controlled feeling. Without any details of color, the black and white teacup has a very subtle, modern feeling.

James
To start off with this sculpture I had to find a tea cup and and plate for it. Susan, my stepmom, thankfully had a stash in which she kept stacks of tea cups. Afterwards I had to take a fork and bend in every which way to get in the form that it would be able to support the cup over the plate. The hard part was over and now it was time to think of a theme. I took into careful consideration everything that I enjoyed the most, such as movies, food, sleeping, etc. I finally came upon them of one of my favorite movies, Alice in Wonderland. One character, the Queen of Hearts, stood out to me because she is such a colorful character.
I chose roses as part of my project because the queen had rose gardens all over her castle. I also chose the knave of hearts because in the movie, the Queen is married to the Knave. The dots are the Queens favorite candy in which the frog stole from her and that is where the frog comes into play. Lastly, the moss gives the theme a more earthy feel because in the movie it takes place in a very barren, mossy, creepy place with some elegant touches drawn in to represent royalty.
I chose roses as part of my project because the queen had rose gardens all over her castle. I also chose the knave of hearts because in the movie, the Queen is married to the Knave. The dots are the Queens favorite candy in which the frog stole from her and that is where the frog comes into play. Lastly, the moss gives the theme a more earthy feel because in the movie it takes place in a very barren, mossy, creepy place with some elegant touches drawn in to represent royalty.

Malorie
Gravity amazes people everywhere and when you get to play with the idea of gravity and trick the eye, the concept becomes a lot more interesting. In this project I learned how to work with gravity and to also create a sculpture that seems to be paused in motion.
I first started with painting a pot that will become my base. I wanted the honey to go a little further than just food I wanted to pull a theme to it. Therefore, I came up with the idea of Pooh Bear. I painted the pot a cool light blue with a thick white strip wrapped around the middle of pot. In the strip I wrote the word “HUNNY” spelt and written in a way Pooh Bear would write it. From here, I took a wooden spoon and sculpted it with Model Magic to create a honeycomb. After the honeycomb, I used a little wooden plank and glued it to the middle of the honeycomb and hot glued the other end inside the pot to create support. Next, I filled the pot about half full with hot glue to give the effect of the pot being full. After the glue cooled I covered the wooden plank and the top of the glue in the pot with Model Magic. I also used Model Magic to sculpt a little Pooh Bear hanging from the stick of the honeycomb. Followed by the sculpture, I painted all the Model Magic a warm honey color. In the honeycomb I painted darker yellow in the indents to give off a shadow. I also did this in the pot around where the honey from the honeycomb and the honey in the pot met to give off a ripple effect. Lastly I covered all the painted honey in Mod podge to make the honey shine as if it was real.
In this project I had to do a lot of problem solving. The first problem I came across was painting the white stip on the pot. I first tried to just simply draw on where i wanted the strip and also trying to keep it as even as I could but did not turn out even. So to solve this problem I took tap to wrap around the pot to give a more clean even line. The next problem I ran across was what to fill the pot with. First I was thinking a cement of some sort but then thought that would make the project much to heavy. As I was hot gluing the wooden plank in the pot i thought why not just fill the pot with hot glue. The final problem I found was when i filled the pot with hot glue the paint I wanted to paint over the glue was not going to cover it. I solved this problem by covering the glu in Model Magic. By covering it in Model Magic I thought this could also help me sculpt a little bit of a ripple effect into the pot as well as shading the paint in it too.
In this project I worked newly with Model Magic. I learned to sculpt with it you need to keep it warm. I also learned that hot glue melts the Model Magic so I learned to just mold the Model Magic to fit to the shape I want and make it stick together.

|

|
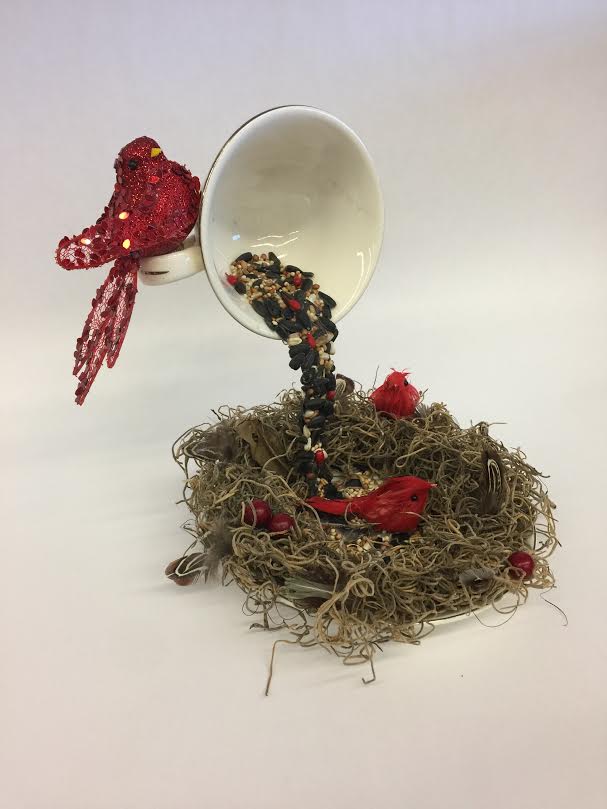
Alysa
To begin the Surrealist Teacup assignment, I admired the work of Andy Goldsworthy. Goldsworthy’s work with natural elements inspired me to create a piece based on nature. Before my project even began it seemed to end. I had many difficulties during the gluing process. At first, my teacup was too off center and would not stand on its own, resulting in regluing. After regluing the first time, I let my project sit overnight but to my surprise when I returned it had fallen over and had not glued properly. Again, I had to reglue. Eventually, I could begin applying the decor to my project. My final project includes a momma bird sitting atop her perch watching over her young in the nest. I first envisioned my project to be a working piece, with candles as eggs. But, with further consideration, I came to the conclusion that this may be a hazard. Along with the birds, I have bird seed flowing from the cup into the nest. Within the nest are feathers. This project represents not only my love for nature but also the teacup I used was my great grandmothers that loved birds.